Create a data collection with the Workbench CLI
Categories:
Prior reading: Command-line interface overview, Data collections in Workbench
Purpose: This document explains how you can create, publish, and manage data collections via the Workbench CLI.
Step-by-step instructions for creating a data collection yourself
You can manage most steps in the lifecycle of a data collection yourself using the Workbench CLI. This includes creating and publishing new versions of the data collection.
The exception (described below) is optionally adding a region policy to the data collection. The Workbench support team can help with that step if it's relevant to your use case— this only needs to be done once.
These instructions assume that you have already installed the Workbench CLI or are working in a cloud app where it has been installed. We also assume some familiarity with basic operations such as how to create a new workspace.
If you'd prefer using the Workbench UI to create a data collection, please see Create and manage a data collection using the Workbench UI.
1. Create the workspace that will underlie the data collection
Data collections are based on workspaces. So, the first step in creating a data collection is to create the workspace that will underlie the data collection. It's best to use a new, not an existing, workspace for this.
The workspace name is the data collection name that users will see.
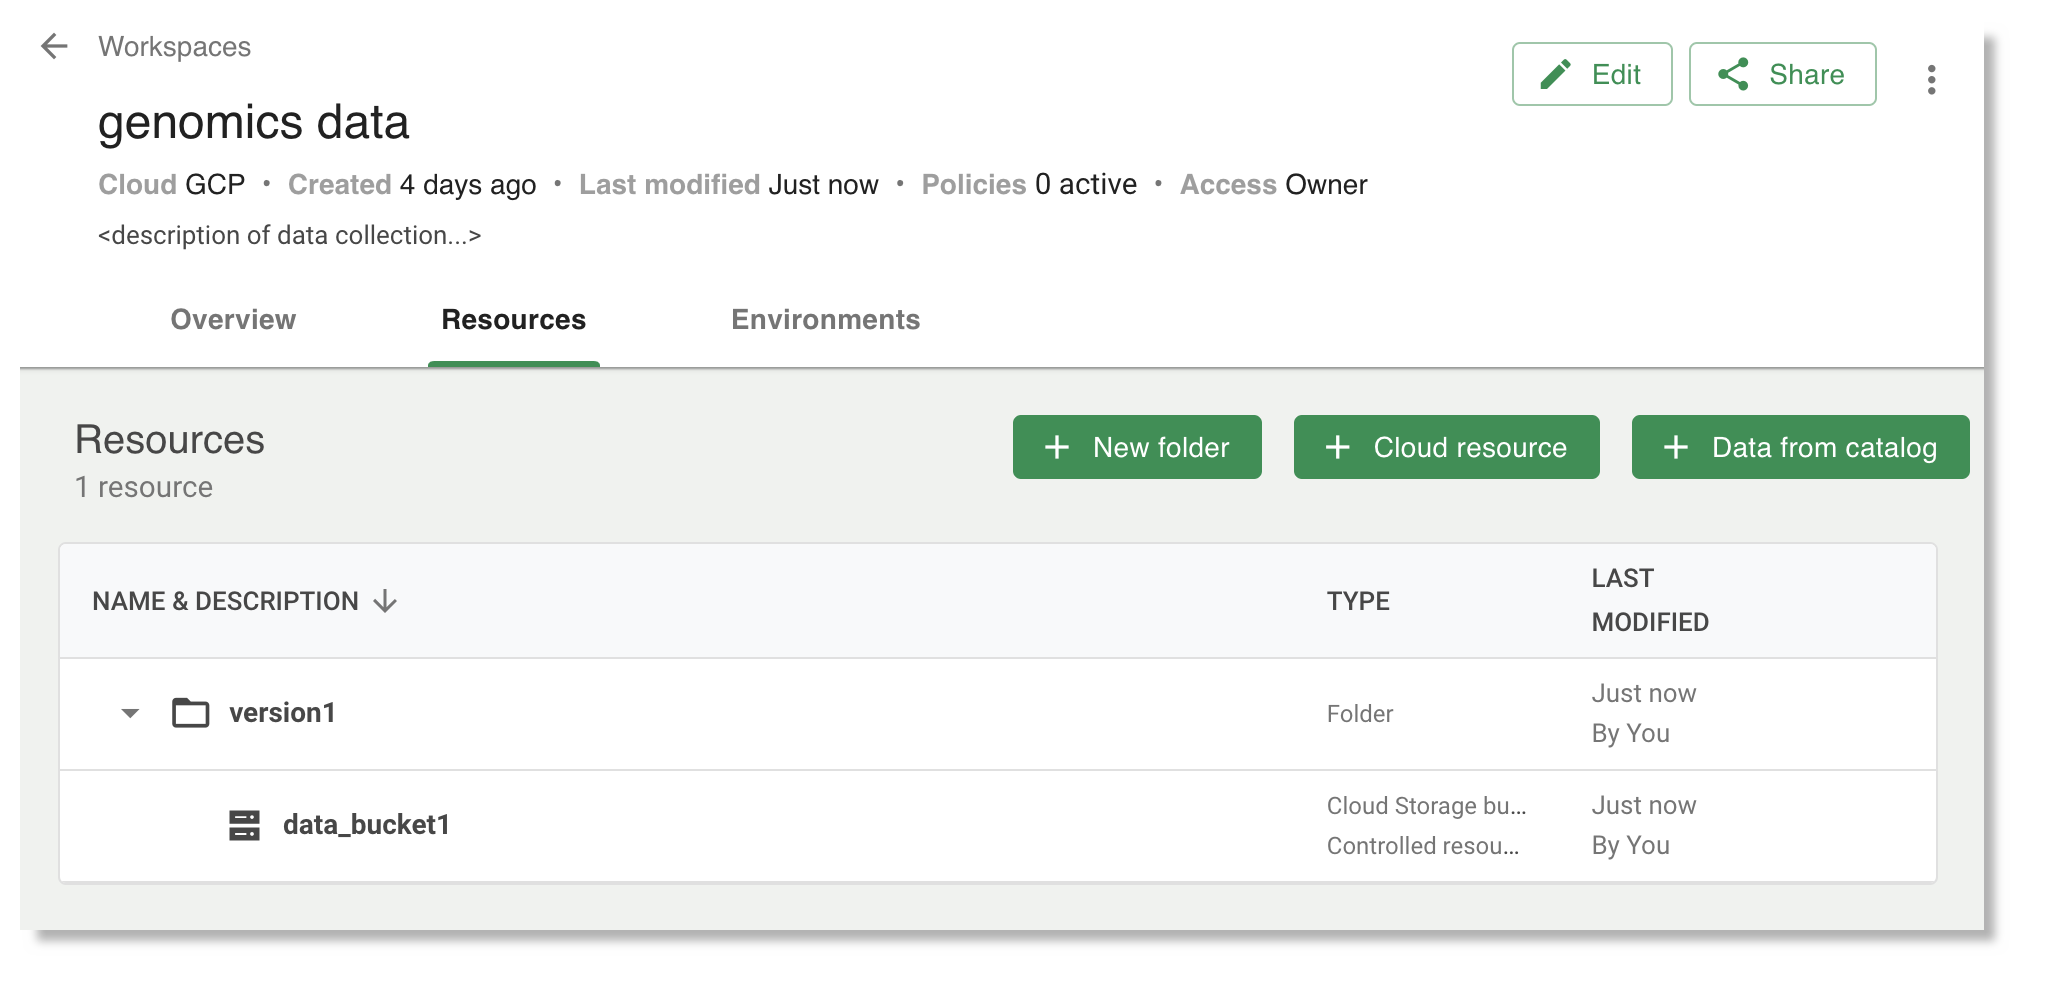
2. Create a folder in the data collection workspace
Under the Resources tab in the Workbench web UI, create a top-level folder with the
name of the first version of your data collection. You can name it whatever you like; however, this is
the name that other users will see for the version, so it's best to name it something intuitive
such as version1.
You can add resources to this version folder now, or do it later.
3. Set the property that turns a workspace into a data collection
Via the Workbench CLI, run the following command, first setting WORKSPACE_ID with the ID of your data collection workspace. You can find this ID in the Workspace details panelt on its Overview page.
wb workspace set-property --workspace=${WORKSPACE_ID} --properties="terra-type=data-collection"
The workspace will not yet be treated as a data collection until you publish its first version, which we'll do next.
4. Publish the first version of the data collection
Publish the folder that you created as the first version of your data collection. Any resources that you add to the folder, either now or later, will appear as part of that version of the data collection. Publishing a version makes its resources accessible to users in the UI, via the Data Catalog under the Resources tab. However, it’s important to note that all unpublished versions and resources therein are accessible to users via the API. All data access is managed at the data collection level, and all resources in a data collection (published or not) are accessible.
Note that for any referenced resource you add that points to an external (non-workspace-controlled) resource, you must ensure that your end-users have appropriate access to that resource.
-
Copy and run the command to set the workspace, which you can find on the overview page of your data collection workspace:
wb workspace set --id=<YOUR_WORKSPACE_ID> -
Then, run:
wb folder treeThis will show the folder structure for your data collection workspace. Copy the UUID that is associated with the name you assigned to the 'version' folder (e.g.,
version1). -
Next, run:
wb folder set-property --properties=terra-published-date=${DATE} --id=${VERSION_FOLDER_ID}Replace
${DATE}with the current date in format yyyy-mm-dd, e.g.,2023-09-20, and replace${VERSION_FOLDER_ID}with the UUID you copied in the step above.
Any resources later added to this folder will be included in that version of the data collection.
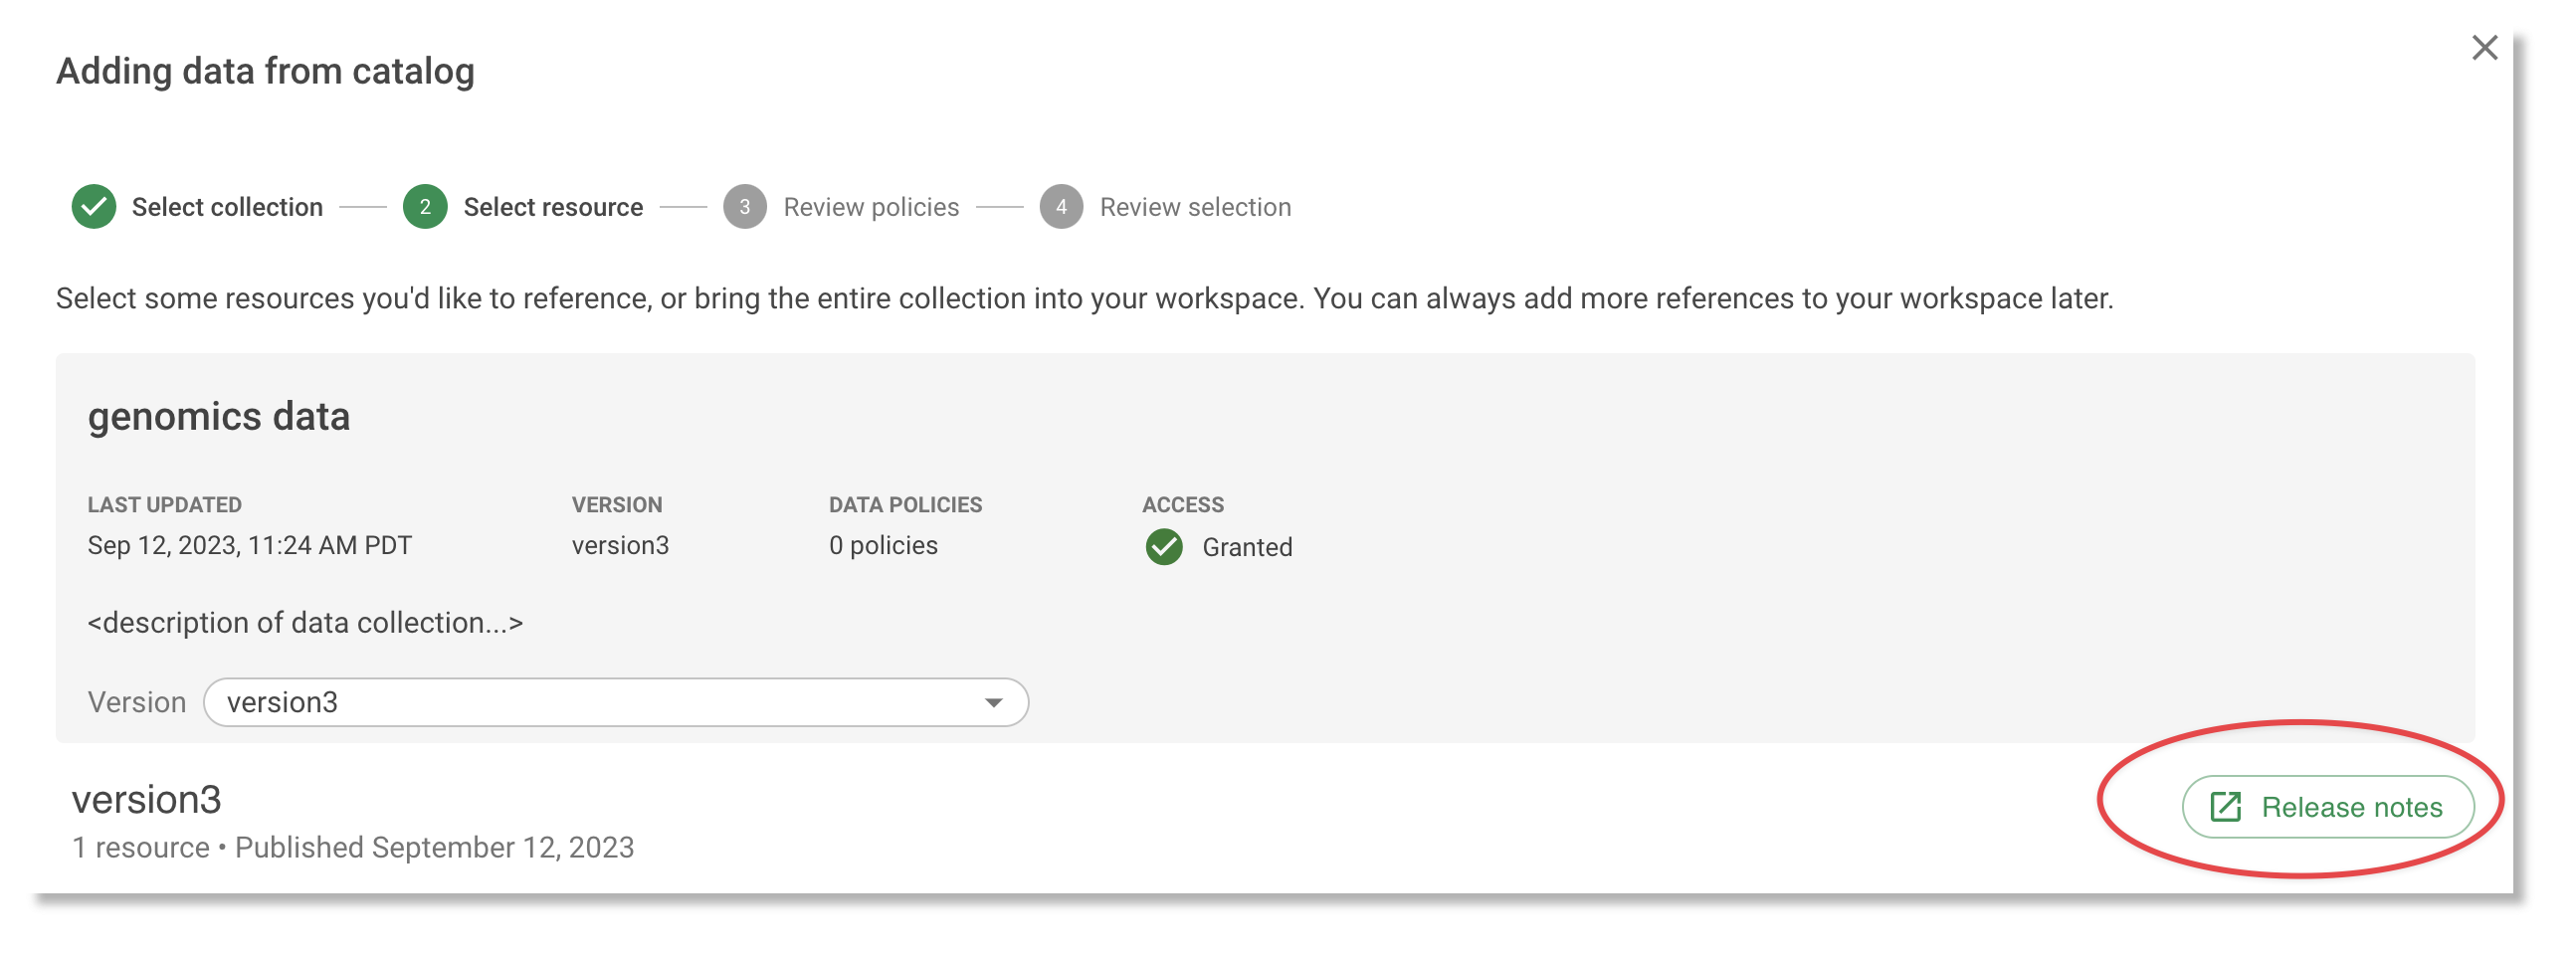
Optional: Add "release notes"
If you want, you can add a "release notes" URL to a data collection version. To do this, set the
workspace and copy the version folder's UUID as described above. Then, run the following command,
replacing ${VERSION_FOLDER_ID} with the UUID you copied, and replacing ${URL} with an absolute URL (e.g., https://www.google.com).
wb folder set-property --properties=terra-release-notes-url=${URL} --id=${VERSION_FOLDER_ID}
If you do so, the user will see a clickable link to view the notes in the version information:
Optional: Add “Organization Name”
Additionally, you can add your organization name to a data collection for users to see when viewing the Data Collection in the UI.
wb workspace set-property --workspace=${WORKSPACE_ID} --properties="terra-organization-name=${ORG_NAME}"
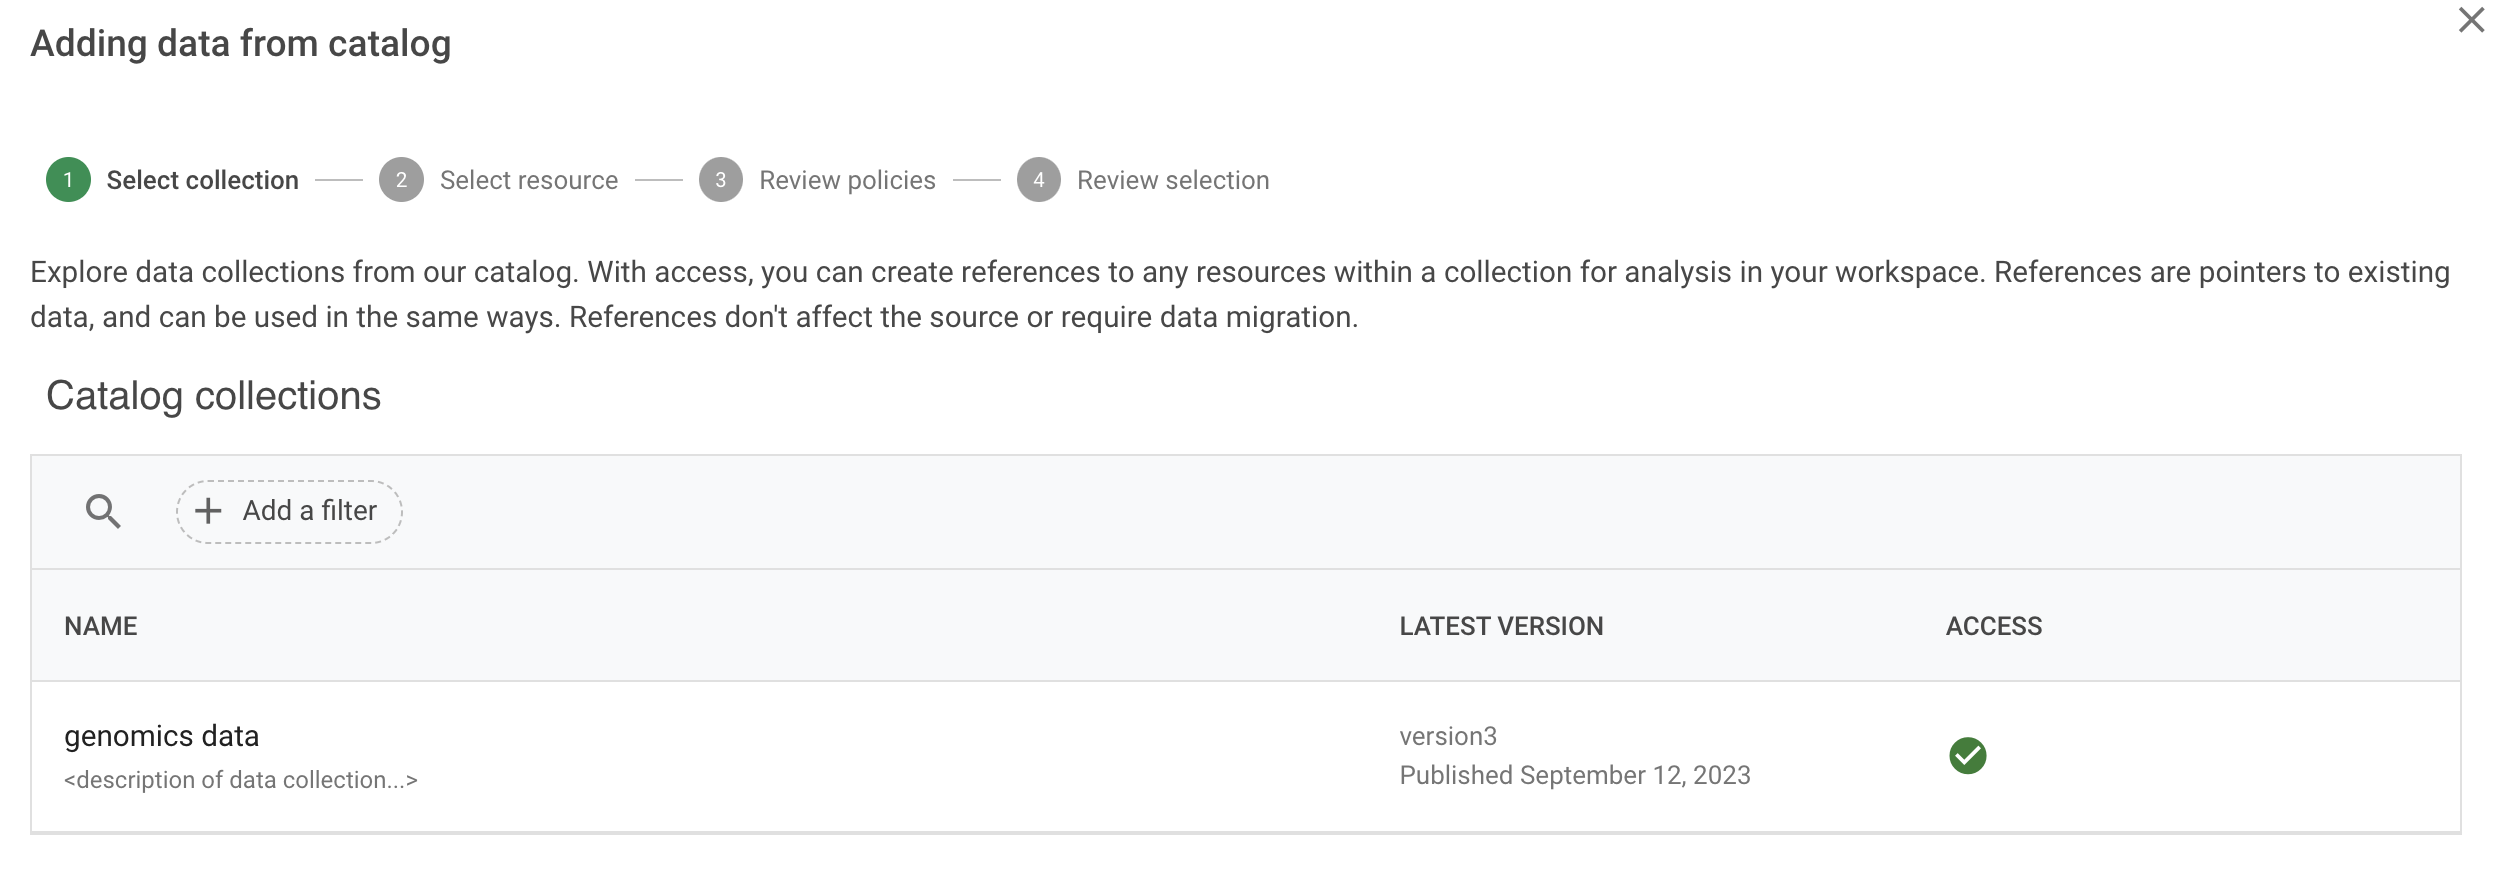
5. Inspect your new data collection
In the Resources tab for a workspace, visit the data catalog to see your new data collection as it will appear to other users.
6. Optional: Set a data collection policy
You can set policies to control which groups can access your data collection, and to impose region constraints. Do this before you share your data collection. See below for more detail.
7. Share the data collection workspace
Now you are ready to share the data collection with other users (or groups of users) as appropriate for your use case. To do this, click "Share" for the data collection's underlying workspace.
For details on how to share a workspace, see the Workspace Operations page. This page describes the privileges for the different access levels.
For details on how to define Workbench groups, see Creating and managing user groups.
Typically, you would share with Reader permissions, which means that consumers of the data collection can view the resources but not modify them. (You may want to give others on your team Writer access.)
Note
It's possible to share a data collection so that it's listed in the data catalog (and thus "discoverable"), but not accessible without requesting access. To do this, contact workbench-support@verily.com, or your primary Workbench contact.
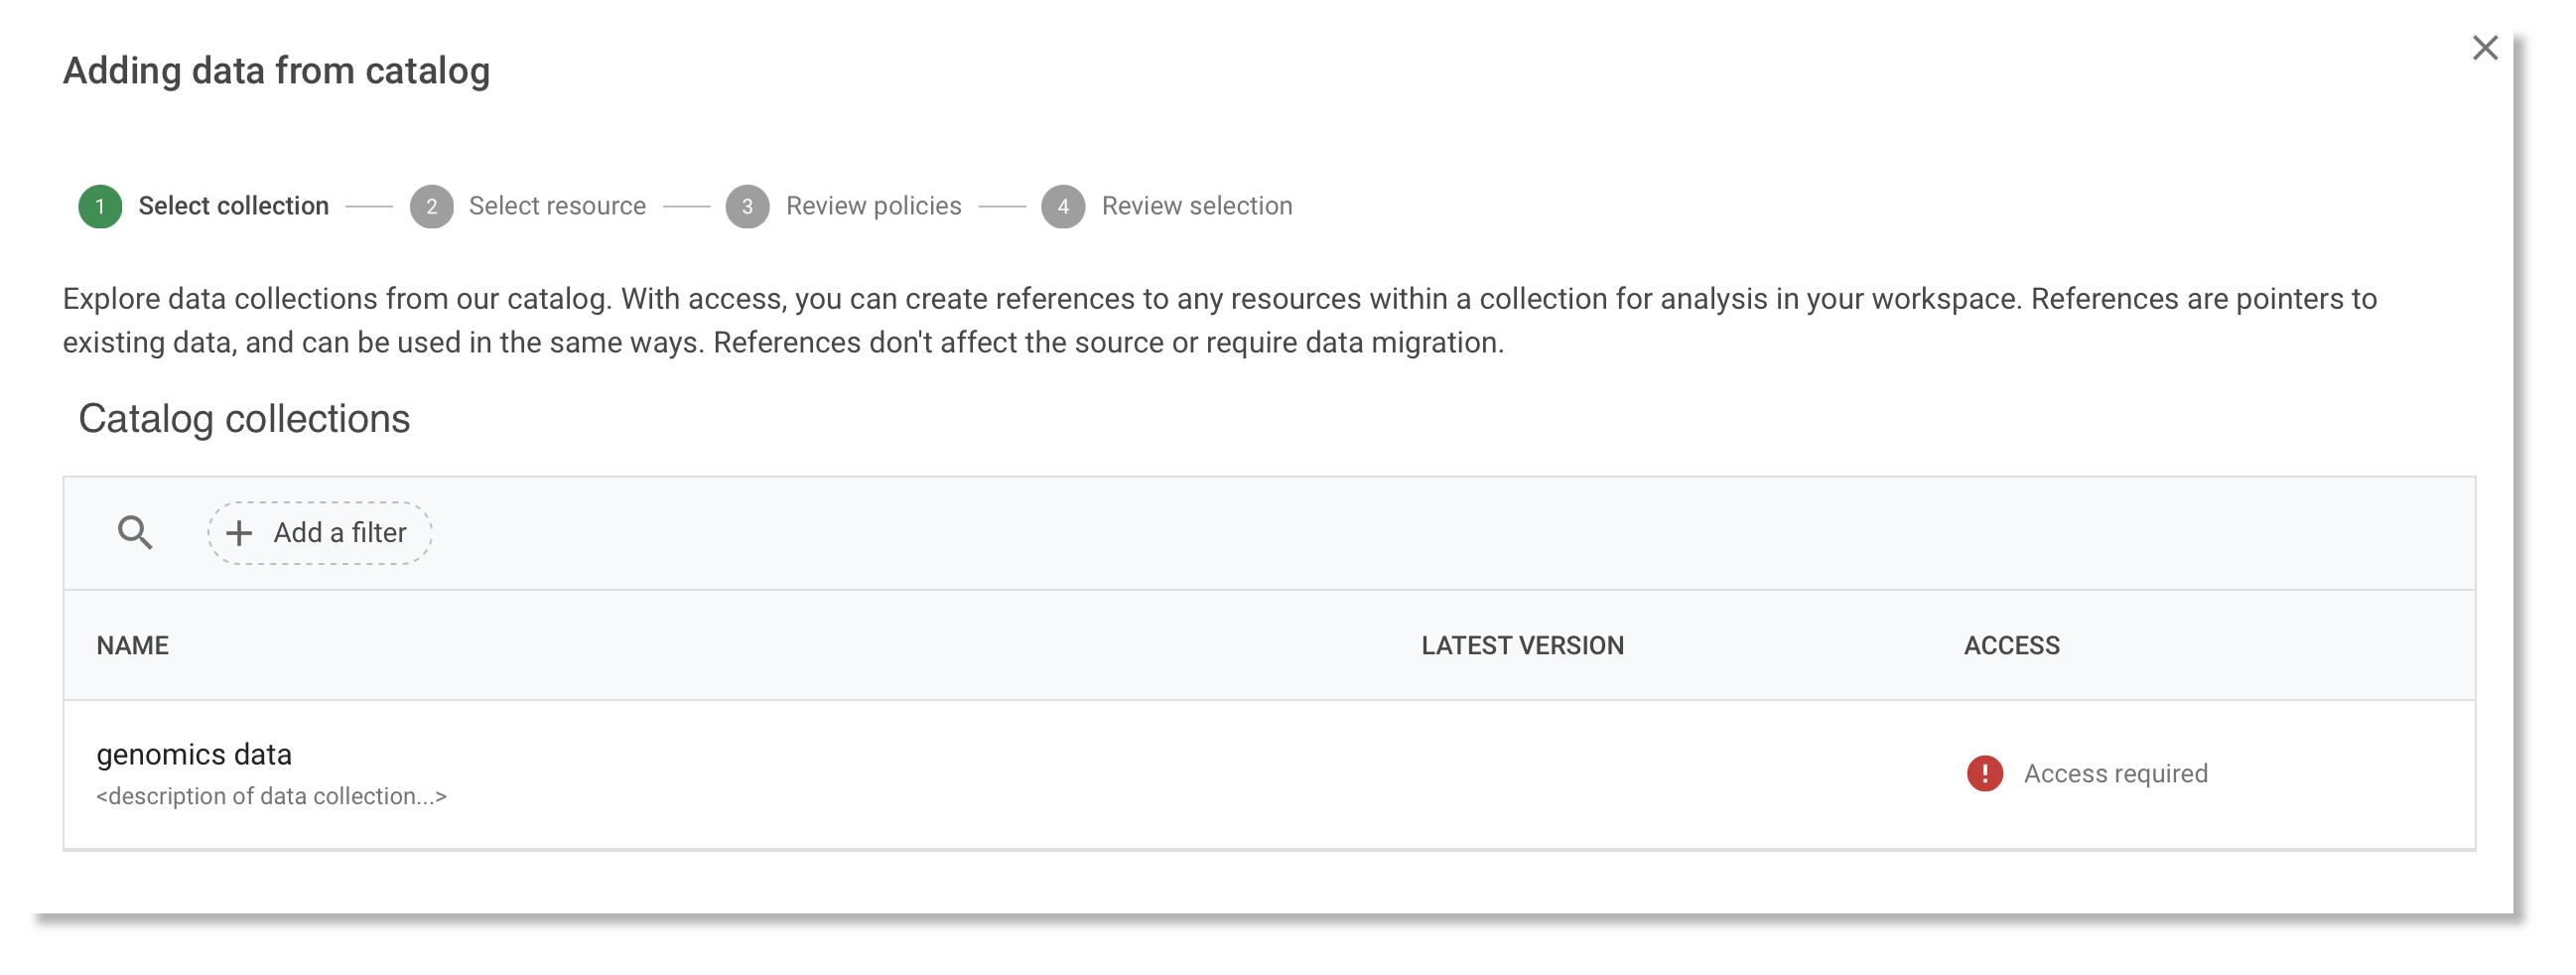
When an end-user imports resources from your data collection, referenced resources are created in their workspace for any controlled resources in the data collection. That is, none of the resources in the data collection are copied; instead, references to them are created.
8. Publish additional versions of a data collection
At some later point, you may want to publish additional versions of a data collection. The process is the same as that described above:
- Create a new top-level version folder in the data collection workspace (say,
version2) - Find the UUID of that new folder (via
wb folder tree) and publish the new version via setting theterra-published-dateproperty as described above.
Users who have imported resources from your data collection into a workspace will see a notification in that workspace when a new version is published:

The newest version of a data collection (based on its publication date) will be the one shown by default to users in the Workbench web UI, but they can select other older versions.
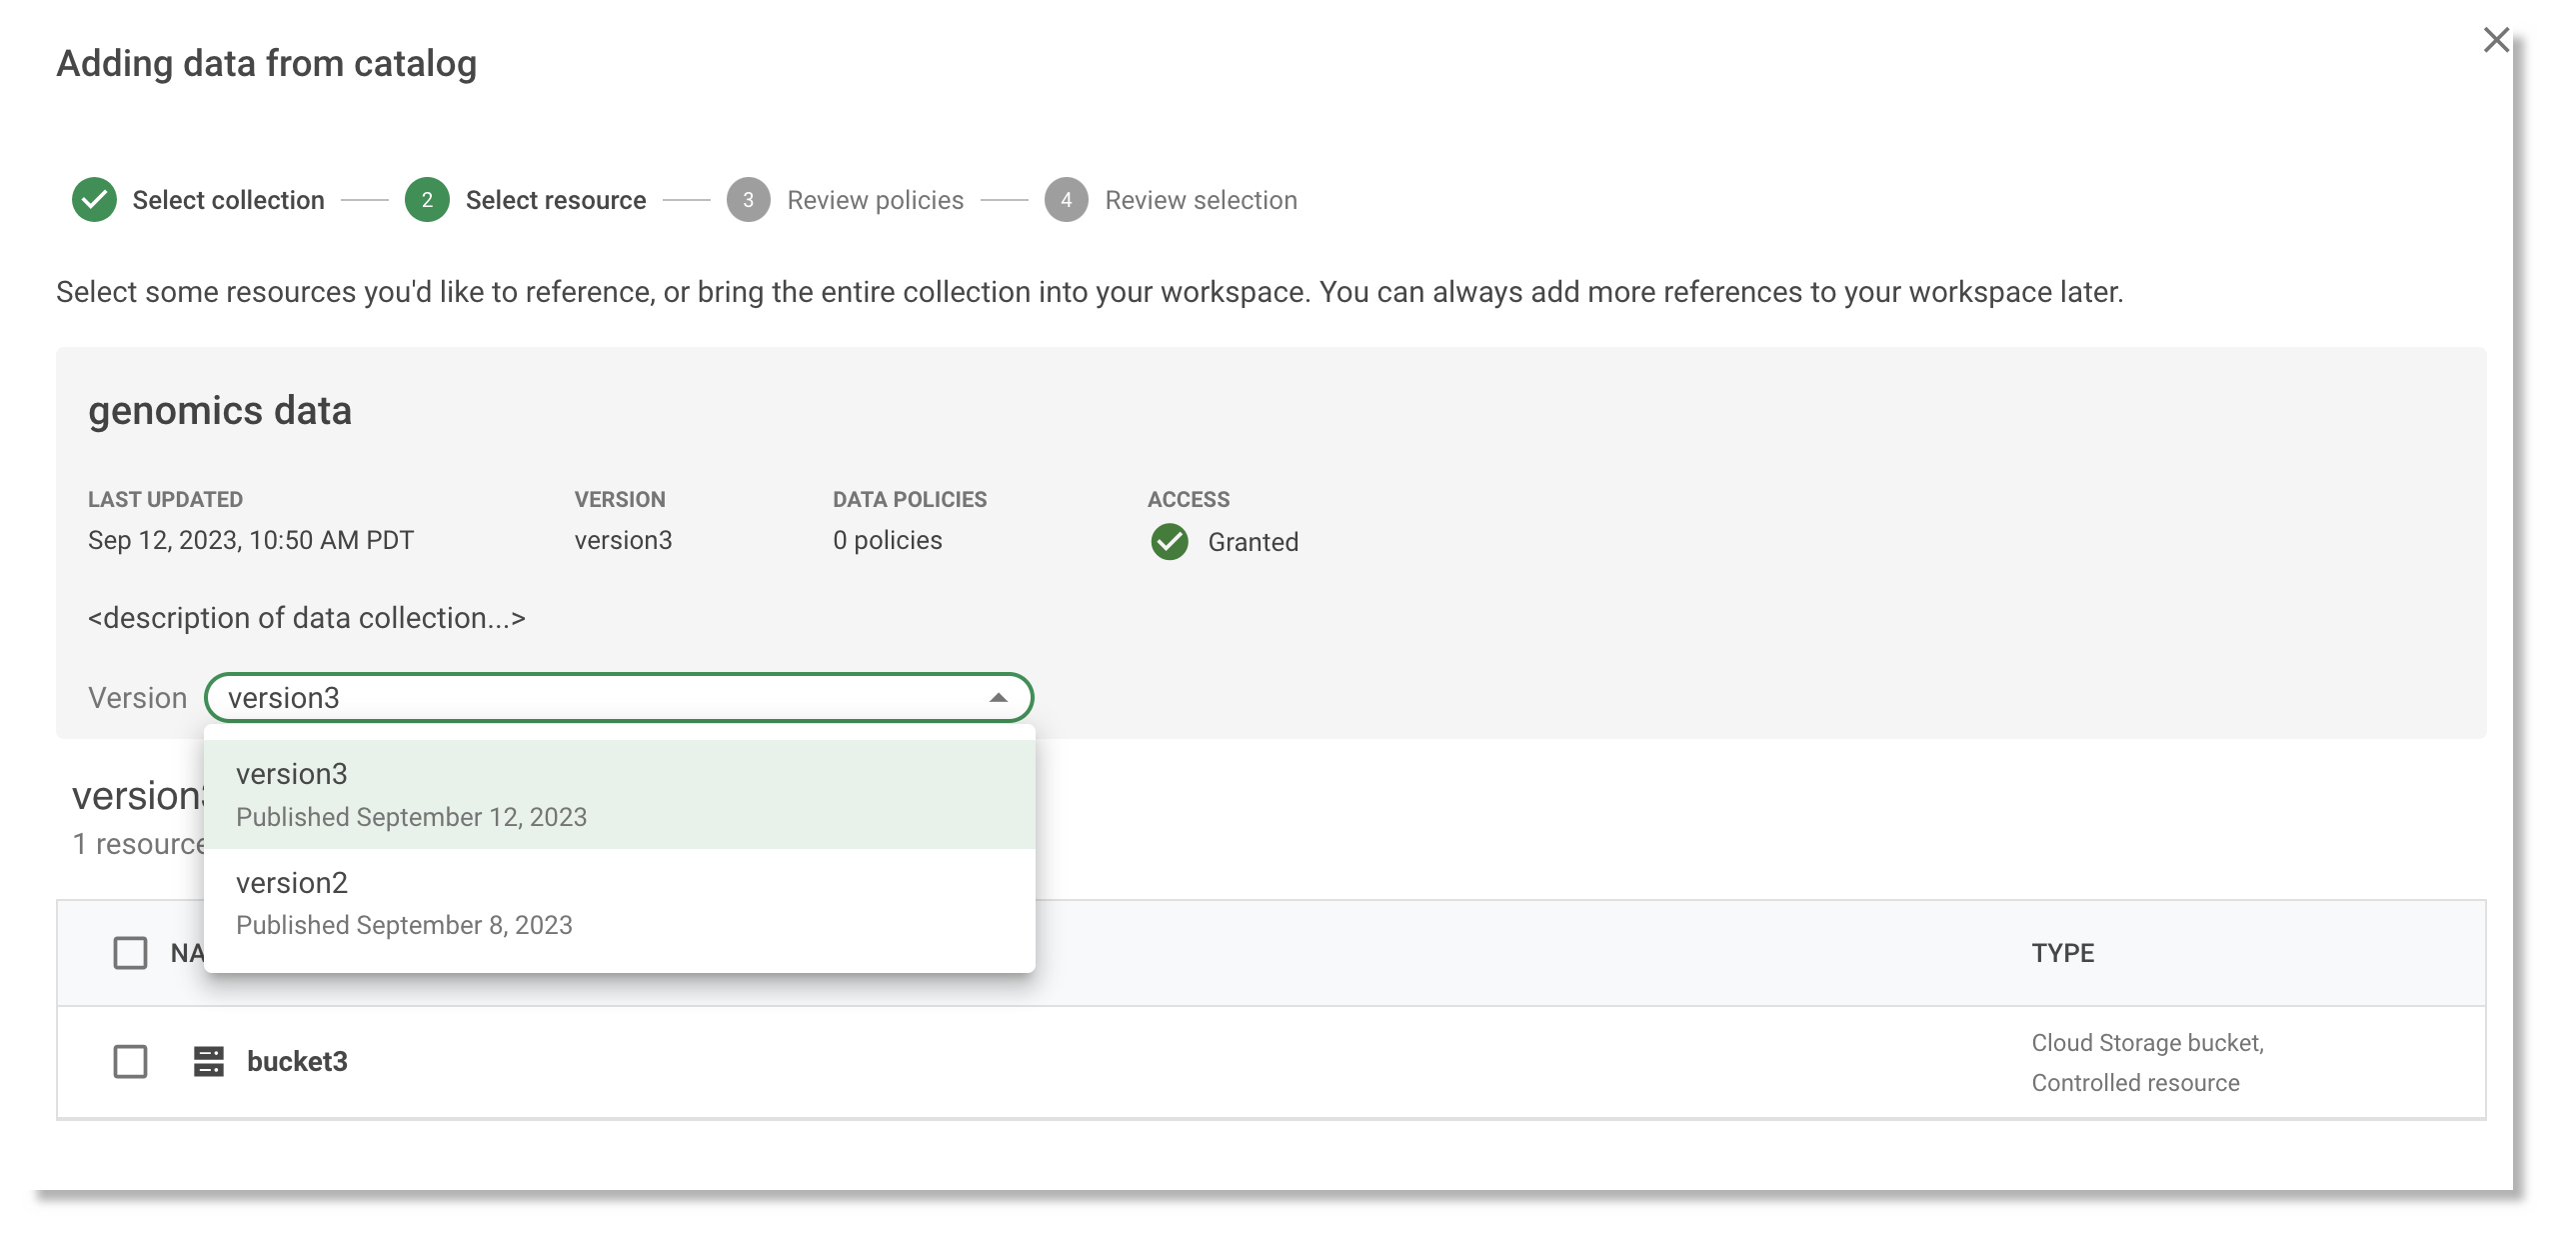
If you have set a policy for the data collection, it holds across all versions.
Additional options and considerations
Including a resource in multiple data collection versions
Currently, it is not possible for two resources in the same workspace to have the same name. This means that if you want to include a resource in, say, two data collection versions— so that the same resource resides in two different 'version' folders— you will need to create a referenced resource in the second version that points to the resource, but gives it a different name.
See this page for more information on creating referenced resources.
Adding a data collection policy
You can set policies to control which Workbench groups the data collection can be shared with, and to constrain which region the data may reside in.
Group policies
A group policy limits the eligible access of workspace and data sharing to members of all selected groups. A group policy does not grant access, but can be used as an additional layer of access control. Like other policy types, a group policy can’t be removed once it’s been applied, and carries over to any duplicates.
You can set the group policy for the data collection's underlying workspace via the Workbench web UI. See Access control and sharing for more detail.
Region policies
A region policy is a type of policy that limits which regions may be used to create cloud resources and apps. For example, if you used data from a collection that had a region policy, your app and analysis outputs must be kept within the regions specified by the policy. When a region policy is applied to a workspace outside of the prescribed regions, the default resource region must be updated in order to comply with the policy requirements. You don’t need to migrate data that was in the workspace before the policy was applied, and references to data aren’t affected.
A region policy only applies to controlled resources. Referenced resources are not constrained. You can add a region policy after you’ve added some resources to your version folder (or more broadly, to the workspace), but note that application of the policy will fail if you have already added resources that violate the constraint.
Currently, we will need to set a data collection's region policy for you, as its configuration is not user-facing. (This will change in the future.) Once a policy has been set, all subsequent versions of a data collection use that policy, so you can add new versions yourself if you like.
Reach out to workbench-support@verily.com, or your primary Workbench contact, for support in setting a data collection's region policy. Do this before you share the data collection.
Perimeter policies
A perimeter policy limits data access and exfiltration by requiring that data can only be accessed from workspaces within a particular perimeter. When the policy is applied to a workspace, that workspace will be enrolled in the perimeter and cannot be removed. The data inside this perimeter cannot be copied into other workspaces, or be read from workspaces outside the perimeter.
We will need to help you create a perimeter and set a data collection's perimeter policy for you, as its configuration is not user-facing. Once a policy has been set, all subsequent versions of a data collection use that policy, so you can add new versions yourself if you like. See Perimeter policy for more details.
Reach out to workbench-support@verily.com or your primary Workbench contact for support in setting a data collection's perimeter constraint policy. Do this before you share the data collection.
Removing a data collection or one of its versions
There are multiple ways to remove part or all of a data collection, depending upon your goals:
-
If you delete the
terra-type: data-collectionproperty from a data collection's underlying workspace, the data collection will no longer appear in the data catalog. However, for any users who have already imported resources from that data collection, those resources will still be available to them as referenced resources. The lineage information that these users see in their workspaces will still point to the data collection's underlying workspace. -
If you delete a version folder from a data collection's underlying workspace, this version will no longer show up as an option when a user browses the available versions for the data collection.
Note that if you delete a folder that contains controlled resources, these resources will be deleted as well. -
If you move a resource out of a version folder, it will no longer be listed in the data collection, and will no longer be imported by users accessing that collection. However, that resource will still be accessible to the user, as noted above.
-
If you delete a resource that is part of a data collection, then users who have imported that resource (as a named reference) will still see the reference listed, but will get an error when they try to access the resource.
-
If you delete the data collection's underlying workspace, all of its controlled resources will be deleted as well, and the lineage information will display "Unknown workspace."
Last Modified: 13 November 2024